Tuesday, November 20, 2018

Knit Whaler's Caps

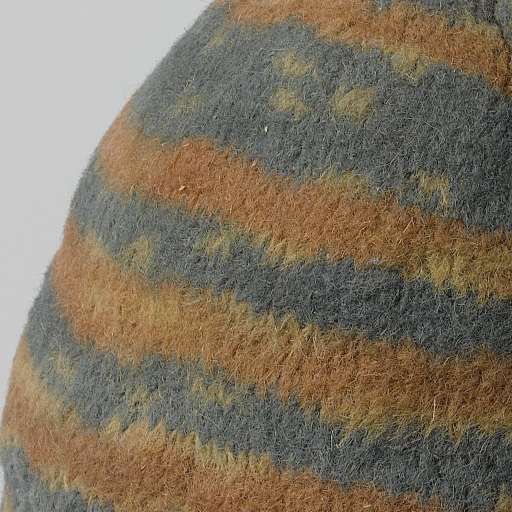
I've been looking for a simple project for over the holidays and came across some interesting and quite colorful knit caps to inspire me.  There is a collection of whalers caps all found near Spitsbergen dating back to c.1650.  I love the patterns and colors of these caps.

Check out the museum collection.

Here's the museum description:

"In 1980 archaeologists investigated the graves of 185 Dutchmen – whale hunters, and workers at whale oil refineries – who had died on or near Spitsbergen in the 17th century. Many skeletons were still wearing their knitted woollen head coverings. These caps were highly personal. The men were bundled up against the severe cold and could only be recognized by the colours and patterns of their caps. Presumably this is the reason why the caps went with them into their graves"

What I find interesting is that the knitting on these caps is quite fine and some appear to have been fulled, while others do not.

I normally am interested in a slightly earlier period, so I decided to follow the pattern of A Sixteenth-Century Basque Whaler's Cap published by Pieceworks.  This pattern was drafted from a close examination of a 16th c. whaler found in Red Bay, Labrador, Canada.  This site is known to have been in use by whalers starting as early as 1530 through the early 1600s.

Comparing this 16th c. cap to the 17th c. ones from Rijks Museum, there are some differences in the brims, but the general construction and shape are quite similar.  The Red Bay cap is of natural light colored wool, but the Pieceworks article theorizes that due to the placement of the grave, this was a sailor of lower rank/station, so this may have been all he could afford.

I choose to go with orange and blue wool, as see in one of the 17th c. Rijks Museum caps.  I'll report back after the holidays with my progress.

For reference, here's another blog about these caps: http://costumehistorian.blogspot.com/2015/04/seventeenth-and-eighteenth-century.html

Thursday, July 26, 2018

More Garters

ETA: I finished the second garter on 9/4.

I'm pleased to announce that I finished my first garter last week.  I've already started the second and will post more pictures when I'm done.

But, more exciting is that a friend, Diane Glewwe, finished one of her garters.  She graciously gave me permission to share her notes and pictures here.  I have edited it only to remove some specifics of the "recipe" as per Jane Malcolm-Davies. So, with no further ado, I bring you:

Diane's Garter
After completing one garter here are my notes.
Hand Knitted Garters
Yarn used:
100% Romney Wool
2 ply from Beaver Valley, Washington
www.insouciantfibers.com
Worsted Weight
96 (g), 148 yards
Needle Size: US 2

What I learned:
In the beginning I was trying to watch the tension, so the edges would come out even. A friend pointed out that the yarn was, slightly, not a consistent thickness which may have caused the uneven edges. (See photo of yarn)
I didn’t sweat the small stuff. I didn’t count rows and gave up on knitting smooth finished edges.
I did make sure the purl row was on the same side of the garter as the other. Honestly, it probably wouldn’t matter because, as in some common extant garments, the finished product would not have been perfect.
It took approximately five minutes to knit 1” (at my pace). Which is about 3 hours to knit one garter.
No automatic alt text available.Image may contain: outdoorNo automatic alt text available.No automatic alt text available.
Image may contain: people standing

Monday, July 9, 2018

Garters!

If I can knit an inch a day*, it will take me ~2 months to finish a pair of garters.

That's depressing.

*Disclaimer: I'm not known for my speed in projecting, and I often only get an hour or so a day to do something / anything that I want to do. 

Better get started!

At the amazing Jamestown conference, we were introduced to some new research on garters by the Tudor Tailors and had the opportunity to examine some 16-17th c. extant knitting examples.

I can't share the "recipe" but the knit fabric was much tighter than I had expected, and it seems they would knit with two strands instead of using yarn with multiple plies (twisted together).

At the end of the session, Jane looked over some of the different yarns we had brought and commented on if they would be interesting/appropriate.  I brought Jamieson & Smith 1 Ply Cobweb Lace Weight.  Jane said she would be interested in seeing the results as it was a commercially available single ply wool, made for heritage knitting.  It has a slightly coarse feel even though it is very fine. It's fairly easy to knit; the two strands "stick" together pretty well. I should mention that I'm a lefty, so I often end up un-ply-ing normal yarn as I knit so it's nice to not be fighting with this. It's also stronger than I thought it would be. I haven't broken it yet!


I started by winding the single ply wool into two balls.  This allows me to knit with two strands.  The next step was to gauge.  From past knitting projects, I know that I have a tendency to knit on the tighter side, so your gauge may vary.  Each sample is 9 stitches wide and 10 rows long in plain knit with 2 strands of the wool.  The one exception is the very small 000 sample where I used a single strand, just for comparison.
Gauges: Starting from the bottom, size 4, size 3, size 2, size 1, size 000
Close up of size 4 and size 3 Close up of size 2 and size 1
Close up of size 000 single and double strandBetter close up of size 000 single and double strand

I didn't have 0 or 00 needles, so I went with what I had.  From the gauged samples, I decided on using size 1 needles with 8 stitches per row to achieve the right size and density. The 000 gave a very dense fabric, but it was rather difficult to knit at that gauge and I felt it was overkill.  Size 0 (if I had them) would likely be a good option as well.

At this point, I've completed about half of one garter (~36 in each), but wanted to share progress! I have a strong spiral curl to my garter that I haven't figured out how to remove, but otherwise, it's coming along.


Monday, June 11, 2018

A New Ruff

I've know for many years that it would be appropriate to own a small ruff.  I made a ruffle 10+ years ago, but it's constructed completely wrong (stacked pleats and folded fabric).  They are featured in the engravings I've been working on reproducing. But, ruffs always seemed a bit daunting.  I had no desire to deal with starch and the specialized irons or poking sticks needed to set the ruff, even if I could work myself up to all the sewing to put a ruff together.

Thankfully, my hand sewing has gotten better and I'm not as scared of the sewing part. Given that we were going to have a starching workshop at the Jamestown Conference, I decided to give it a go.

I followed Noel Gielgehem's guide to making a 1570's ruff. Noel is the foremost authority on ruff making that I know, and he would be the instructor of the workshop.  The ruff is entirely hand sewn.  It took ~ 4 nights or 8-10 hours of sewing to construct.

The strips before sewing. ~4 yds.
A close up of the edges to be turned. I pulled threads to ensure a straight and tight hem.

The sewn strip, complete.
Size of the turned hem ~ 3/16

A view of the gathered / cartridge pleated edge before sewn to the neck band.

A quick finger set of the ruff.  The rest of it still looked completely random.
In the workshop, I didn't have a chance to starch it, but I was able to press it with Noel's curling irons.

I should have taken a pic before wearing it because the shape really collapsed after 2 hours in the heat.  I guess this makes the point about the need for starch.

Sunday, June 10, 2018

Jamestown Conference - Day 4

I'm back home after the conference, but still in a bit of a daze from the amount and wealth of information.  It was truly wonderful, and no small amount of effort to pull off.  My thanks to all involved.

The morning started with new sessions from Jane and Ninya.  Ninya walked us through the basics of pinking and stamping fabric.  It seems to work best on silk satin or velvet.  I particularly like the look of stamped velvet.  Ninya had some samples of modern velvets, both cotton velveteen and acetate based, plus a small sample of real silk velvet.  It was surprisingly difficult to tell the difference between them.  Ninya referenced an article by Arnold, which I have a copy of.  Here is the full citation for anyone interested:

Janet Arnold (1975) Decorative Features: Pinking, Snipping and Slashing,
Costume, 9:1, 22-26, DOI: 10.1179/cos.1975.9.1.22
http://dx.doi.org/10.1179/cos.1975.9.1.22

Jane walked us through some of their findings from the database of wills that they have developed.  She had us color in pages of little figures in the proportions of colors seen in the wills.  I'll wait for the full details to be published, but it was surprising to see just how much black there was.  Red was much more common on women than men, but might be covered by outer layers.


Jenny Tiramani gave a key note speech during lunch.  She talked about some of the things they are working on currently, but as many will eventually be published, I can't share details.  But, I loved the leather hose example, and just hearing her passion for the work.  Much as the Tudor Tailors follow the PAD model (Pictorial, Archeological, and Documentary evidence), Jenny uses the 4 C's: Content, Cut, Construct, Context for understanding an item and it's place in history.


First up after lunch was Matthew Gnagy's class on the Bara system.  I've already made a doublet following his first book, so had been through the process of making proportional tapes.  It was still great to see how he does it and the material he uses (boning casing for making tapes works really well).  At the end, he quickly drafted a doublet pattern.  I'm a bit jealous that he could free hand all the curves (I had to use french curves).

To end the day was Jenny Tiramani's workshop on stays.  Much of the material will soon be released in the new Patterns of Fashion 5 book due out in a few months. We got to see several draft pages and it looks equally as good as the previous PoF books.  I didn't realize that stays were often stiffened with baleen (as in, from a whale).  We got the chance to touch and feel real baleen.  We finished with making a small sample of stiffened stays using artificial baleen and reeds.

Saturday, June 9, 2018

Jamestown Conference - Day 3

The morning started with workshops by the Tudor Tailors.  Jane talked about garters, mostly knit.  We got to touch and examine extant knitting pieces from the 17th c and learned that when cross gartering, you should twist at the back! I forgot to take pictures, but Jane did look at the yarn I brought and liked the weight and feel of it, so I shall be knitting some garters and reporting back.

Shetland Wool Brokers J&S cobweb single ply

Ninya walked us through how to fit cloth bias cut hose.  You first pin on your leg, then cut the slit for the gussets while it's on your foot.  Next cut out the gusset triangles and pin in place on the foot.  Then trim for seam and sew.


The afternoon included a workshop with Kat Ferneley to make hooks and eyes.  It's really amazing the difference having the right tools makes. She handed out a great list of instructions and supplies and where to get them.

Noel's starching workshop was fun.  I didn't get a chance to actually starch the ruff that I made, but I did sew the guide thread and use a curling iron to set the figure eights.

The evening was the fort frolic.  It's pretty amazing to see folks in some of their best period clothing.  This included a few in 18th c and even a few native americans.  There were also several who choose modern dress, which, given the heat, was not a bad choice.

The amazing group of tailors. Picture courtesy of Andrea Callicut.

I did dress in 16th c.  I was debating up until earlier in the day, but getting to set my ruff was the deciding factor.  It was hot, but I'm glad I did it.  The highlight of the evening was Grace, decked out in her amazing lace, working up the gumption to talk to Jenny Tiramani. 

Friday, June 8, 2018

Jamestown Conference - Day 2

Today started with a tour of the Jamestown Fort.  Really, we were let loose in the fort to explore.  There were several demonstrations which were great to see.

Kat Ferneley was making hooks and eyes and pins.  I'm looking forward to taking her class later.

The tailors, Dan Rosen (Plymoth Plantation), Matthew Gnagy (Modern Maker), and Mark Hutter (Colonial Williamsburg), were busy making a summer weight suit in the new world style.  This translates to an unlined pair of canvas breeches and a canvas cassock (the source of the canvas was hemptraders.com).  It's really a marvel to watch them all work.


Noel Gieleghem was showing off his many ruffs and the colors and construction of them.


There were other more common fort demos ongoing.  Thankfully, the weather wasn't too warm, and we were only out and about for the morning.  We probably didn't need the full time and ended up killing some time before lunch.


After lunch, we had three lectures. Unfortunately, they dimmed the lights, so with a full tummy, it was difficult to stay focused.

Drea Leed spoke about the typical wardrobe for children as detailed in the Petre Family inventory.  It was interesting to see the differences between the different ages.

Dan Rosen spoke about his learnings from several colony / new world provision lists dated 1622 to 1672.  He consolidated the list of 49 items spanning a cap, shirts, suites, shoes, stockings, points, garters, etc.

Fred Scholpp spoke about the tailoring of armor and the proper fit of it.  Just as the waist of doublets is shorter than our modern eye thinks it should be, so are the waists of breast plates.

By far the highlight of the day was the presentation from the Tudor Tailors.  This was a new presentation and covered the outfitting of a sailor into land-lubber clothing, complete with undressing and dressing back up.  It was hilarious with plenty of jokes (everyone was named John) and even a dig at building a wall.

Renaissance Pattern Books

Reminder to self: always run a complete search before diving down the rabbit hole to research something.  I started a list of 15th-17th cent...