Wednesday, April 23, 2025

Silk Banner Painting

 I've been making smaller painted silk scarves for years, but I'd always wanted to try something larger.  With the encouragement of a friend, I've now made several banners.  I generally use a resist method (habotai) and modern, heat set dyes.

These designs are based on historical examples.  From looking at many examples, the square or rectangle shape banners mounted from the top seem to be used in religious context.  For what I was interested in, I based my initial designs on examples from Banners, Standards, and Badges (see a digital copy of the book).

Here's a sample.


I first drew out the design on graph paper.  I used leftover packing paper to draw a full size version of the designs and marked the lines in marker to make them more visible.

I had intended to use pre-hemmed scarves, but my friend convinced me to try (and lent me fabric to do so!) using silk yardage.  This was also the first time I tried colored resists to draw the lines.  It was quite a bit of tedious resist drawing, but I think it turned out well.

Here are some in progress pics and the finished (and hemmed) banners.


I had one more banner that I wanted to try.  This is a banner of my husband's SCA arms and is based on the Sackville Pedigree:

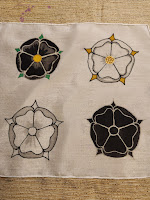
For this one I did use a pre-hemmed silk scarf.  My friend encouraged me to try adding shading, so I first painted a silk scarf of Tudor roses with variations of shading.  Then, I moved to the full banner.


Finished banner:


It's been fun to make banners, but the most fun is applying the paint/dye.  This is when your design really comes to life.  However, there is a lot of other work to get to a finished banner, including washing your fabric, planning the design, mounting the fabric (assuming you already have a frame to use for stretching), transferring the design to the fabric, applying the resist (requires patience and a steady hand!), hemming, heat setting the dye, washing the excess dye out and ironing.  I've generally used an iron for heat setting, but for these larger pieces, it makes sense to use your dryer.

A another friend recently asked me to make an antifa banner.  This is the largest one I've done!  I'm generally happy with how it turned out, but the heat setting was not consistent, so the black is a little blotchier than I would like. (Feet are included for scale)


After cutting out and hemming all those tails, I was left with some triangles, so I ran a little experiment on heat setting. Please note that the the top two triangles had two coats of black applied; the bottom two only had one coat of black.  From top to bottom: heat set in dryer on high heat for 60 min, heat set sitting in the sun for 60 min, heat set using iron, heat set in dryer on high heat for 60 min.

The best and most even is the two coats of black heat set in the dryer.  Using the iron on large pieces tends to leave some iron marks or unevenness.  Putting in the sun is eco-friendly, but didn't work quite as well.  You also have to account for the wind if you choose to use the sun.

The color differences won't be as noticeable with lighter colors.


A Summer Cassock

Recently, my husband requested a light weight cloak or cassock that can keep the rain off on a summer day.  I happen to have some summer weight wool, so figured I'd give that a try.

I did a quick water test on the unfulled wool, and water beads on it, but I'll be washing it on hot first to see if I can full it a bit to make it even more water resistant.

His preference is to have sleeves, and he doesn't need this garment to be full like a sleeved cloak, so I'll be making a cassock.  I'll follow my basic cassock pattern, but make the body a little more narrow.  This cassock will include a collar with a keyhole neckline (by request).

And now for the pattern and inspiration pics.

I like the detail of the trim around the buttons at the neck, so I used a while silk ribbon on the blue wool.  
Here's the almost finished cassock.

I need to hunt down a pic of my husband wearing it.  The final product has buttons and button loops and he fills it out better than my mannequin. 

Friday, June 17, 2022

My Buttons

 After teaching at the recent Jamestown Clothing Conference, someone asked me for pictures of my buttons.  I've posted about the research I've done, but only a few of the buttons I've made.  It's about time I fixed that.  

As part of my class, I put together a button sample board to show the variety of buttons between 1550 and 1650, and to make sure that I can actually make them in approximately the right size and the right materials.

So, with no further ado, here are some of my buttons!


(first photo taken by Jane Cadieux)


Jamestown Clothing Conference

We made it.  After Covid delays, the Jamestown Clothing Conference was back.  Chris was able to attend this year (due to my awesome sister watching the kids for the weekend!), and I was a presenter.  It was amazing to be back and to be a part of it, even if there were a handful Covid cases announced in the days after.


The hubs and I attended the natural dyeing workshop and jack of plate workshop at the beginning of the conference, and I got to tag along to the hat making workshop as well!  It was full weekend, especially considering it feels like I've forgotten how to 'people' after the last few years.

I don't know that I have any major epiphanies to share this time around, but I was rather focused on the button workshop I taught (4 times over 2 days).

This conference will always be a special place for me.  It helped me re-find my passion for historical clothing.  I'm so glad we were able to make it.

Monday, May 30, 2022

Handout for Jamestown Historical Clothing Conference

 I'm looking forward to the upcoming conference at Jamestown next weekend.  The rising Covid numbers make it a bit scary, but I'm still planning to go masked.  

For the Making Buttons workshop I'll be teaching, we'll be making two different button types: Evenweave and Buttonhole.  You can download the class handout for reference.

A Pair of Pants

Back in November, I made a pair of pants for a friend.  He had some specific requirements, like the size of the cuff opening needed to accommodate his armor.  Because of this, I convinced him to try a cuffless style.  I'm pretty please with how they turned out.  

The pants are made of linen and all finishing details (trim, buttons and buttonholes, etc.) are done by hand.  He also requested an adjustable waist, so I hand made some eyes to run a tie through in the back.


Tuesday, February 15, 2022

Banners

We're interested in making a banner that would be appropriate to the 16th century.  So, I started researching to see what shapes and sizes I could find.  Square flags seem pretty common for heraldic displays, but there are many other shapes as well.  I have a growing collection of pins, but will highlight the different types here.

I pulled this image from a video on "The State Funeral and Heraldry of Mary Queen of Scots", but haven't been able to find more details about the image.  I suspect it lives somewhere in the Westminster Abbey Library.  It is an inventory sketch of the flags and banners from the funeral and shows square flags and a pennant.


My other favorite image that I've found is a pedigree from 1599 which celebrates the marriage of Robert Sackville to Margaret Howard and happens to include some flags and standards showing the proper display of heraldry.

Basic Banner and Flag Types:

Pole on Top with Dags

These are seen most commonly in a religious context, and similar shapes are still seen in churches to this day. 

Square Flags

These are often heraldic in design and may have been stiffened as they are often depicted looking quite rigid.  Some examples are see in the image above for Mary Queen of Scotts.

Rectangular Flags

These generally don't look as stiff or rigid and the square flags.  While they often have heraldic symbols on them, they are not as structured in design as the square flags.

Pennants

Long tapering triangles that ripple nicely in a breeze can be seen in a few different forms.  Some are quite narrow and very long (see the ship in the Ommegang painting of 1615; image 17 of 89).  Some taper to a single point while others split into multiple tails.  They can be quite large as seen in another of the Ommegang painting where there is one taller than a horse and twice as long!

Silk Banner Painting

 I've been making smaller painted silk scarves for years, but I'd always wanted to try something larger.  With the encouragement of ...